


Have you noticed anything different in your Facebook Ads Tools page recently? Yes, that’s right – the Facebook Pixel has been revamped!
What is it?
It is the tracking code that is soon going to replace the good old Conversion tracking pixel that you have been using (by the second half of 2016).
See? So you need to switch to the Facebook Pixel as soon as possible (and not wait until you absolutely have to!).
This is what it looks like:
PC: Facebook
Notice the portion highlighted as the base code? That is what you need to paste in every page of our site between the <head> and </head> tags.
What does it do?
Well no more different pixels for different purposes. Remember how you were using the old custom audience pixel and conversion pixel? This Facebook pixel does the job of both!
With this pixel you can –
a) Track conversions
Tracking conversions (or any other action that a user takes on your website) has been drastically improved. It lets you track a specific kind of activity that a user takes, instead of something as generic as “conversion”.
I shall tell you what I mean. When you click on “Tools” section of your Ads Manager, you will encounter four options under Facebook Pixel:
- Create Ad
- Create Audience
- Create Conversion and
- Actions
We shall look at the first two a bit later. For now, let us see how to track conversions. Clicking on the “Create Conversion” tab will bring you to this dialogue box.
As you can see, you are again faced with two options: Standard Events and Custom Conversions. Let us look at both a little more in detail.
1. Tracking Conversions with Standard Events:
Facebook provides you a list of usual actions a user takes once he lands on your website. These actions are called “Standard Events” and with this pixel, you can track the user for these actions in particular.
A complete list of these actions are:
- View Content : For finding out when a user reads an article/post on your blog; Or views the pricing page or a free-trial landing page
- Search : Track the specific search term in your website like product specifications or pricing or downloadables
- Add To Cart: Know when a specific item is added to the cart by the user. This is very pertinent to e-commerce businesses
- Add To Wishlist : Identifies when a person adds a product to their wishlist. Again, helpful for e-commerce businesses
- Initiate Check out : Tracks when the user has initiated check-out or payment process for a particular item
- Add payment info: Recognizes only those users who proceed to add the payment information for further processing
- Purchase: To detect those users who actually complete the payment process and purchase an item
- Lead: Category of users who have signed up for a free trial or visited a landing page; They could even signed- up for a demo (this is perfect for businesses trying to generate leads online)
- Complete registration: To isolate those who have say signed up for a webinar or your weekly newsletter
So opting to track conversions with standard events will lead you to choose that criteria which is most suitable for your purposes.
Simply identify the event you wish to track and copy the code pertaining to it. Alternatively, you can email the pixel code to yourself as well (by clicking “Email Pixel Code” at the bottom).
Now comes the tricky part. You have to paste this code (the standard event code) within your facebook base code, but only on those pages of your website that you wish to track.
For example, you want to track the number of conversions for your free-trial landing page. You shall create an ad for the same and then paste the pixel code of “Lead” copied from above only in that landing page.
Note: Do not paste the standard event code in the HTML section of every page – it should go only in the thank you pages (the pages which help you track conversion).
Where exactly to paste the standard event code?
So, you can’t paste the code just anywhere on the website. You have to keep these two things in mind:
Remember the basic pixel code from above? Well, you have to paste the standard event code inside the base code, within the <script> and </script> tags. This is what it will look like![]()
PC: Facebook
Here, 1 represents the HTML script of your website, 2 the facebook pixel base code and 3 the code for standard event you want to track. 1234567890 represents your facebook pixel id.
- The standard event code should always be placed only in the page you want to track the conversion! Do not make the mistake of pasting it in every web page (like your base code).
2. Tracking Conversions with Custom Conversions
Now, if you would rather not go around pasting the conversion code on every sign-up or registration page, you have an easy way out.
Simply choose “Track Custom Conversions” and you will come to this page:
Simply type in certain keywords that is present in all the landing pages you wish to track. I shall give you an example.
Let us suppose you want to check for the number of people who register for your free trial and those who register for your demo and even your webinar. All you need to do here is choose the key word “thank you” in the URL contains option. This will ensure that whenever a user lands on a Thank you page after completing an action (signing up for webinar, free trial or demo), they would get tracked.
You can then choose how to categorize this event. You can use the same categories as Standard Events (viz. View Content to Lead) or use the option “Other” and use a separate name like “Sign-ups”.
After doing so clicking on “Next” will lead you to this:
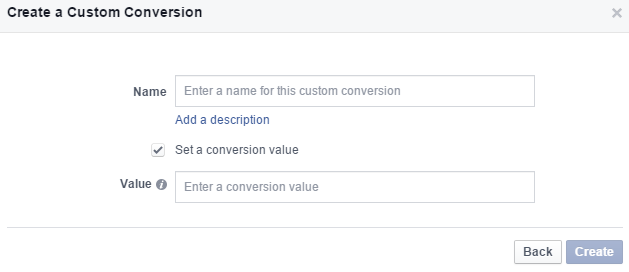
Here you can name your custom conversion list (to make it easily identifiable), add a description if you so wish and also set a conversion value (not compulsory) before you create this tracking method.
The conversion value
You can also assign a conversion value – that denotes how much a conversion is worth to you. This is pertinent to those who are selling online directly.
b) Create Audience
Well, usually the first thing you need to decide before running any ad is the audience you want to serve it to. Guess what? The facebook pixel helps you make your audience a lot more specific! You can now target those people who have already visited your website (after adding your facebook pixel). Yes, we know that you always had this option. However, how you do it has now changed a bit.
Once you click on “Create Audience” tab of your Facebook pixel, you will be directed to choose your target audience. You can target them based on:
- Anyone who visits your website
- People who visit specific pages in your website
- People visiting specific pages and not others
- People who have not visited in a certain time
- Custom combination
Since the first few are pretty straightforward, let us discuss the “Custom Combination” in more detail.
Using this feature, you can target those who have visited particular pages in your website and thus make your ads extremely relevant. Let us look at an example.
Supposing you have increased traffic in your blog for a few days and people are downloading a particular ebook or white paper that you have published. However, some of them do not sign up for webinar as you had hoped. With the facebook pixel custom audience, you can include those who have visited an “ebook thank you page” or an “recording thank you page” but have not visited a “thank you for registration” page! That means, your ads will be shown to those who have downloaded an e-book or seen a recording of a webinar but have somehow not signed up for your webinar! Awesome right?!
C) Creating an Ad
Let us now see how it can help you when you actually go about creating an ad. Clicking on “Create Ad” will lead you to the “Choose your Objective” section.
When you pick “Website Conversions” as your objective, you can optimize your ad for a particular conversion that you just created in your new facebook pixel!
Here, the portion highlighted in red denotes the pixel we created in the beginning of the post! Any conversion value you have previously assigned to these visitors will automatically get added.
The remaining steps of creating a facebook ad stay the same. The only difference is, that you can again choose which audience to show it to (“those who visited your page”) using the list we created just now.
Any other benefits?
I know what you are thinking “So they have just found a way to combine two functions into code. What is all the fuss about?!”. Well, the new Facebook pixel does more than that.
a) You can now share your pixel code
That’s right! Do you have a media agency you have partnered with? Well, you can share the code with the business manager for your account!
The option “email pixel code” lets you email it to a developer so that they can incorporate it into your web pages (if you find that tricky).
b) Your website loads faster
Once you redirect your audience to your website with a compelling ad, the website load time can make a tonne of difference. If it does not load fast enough, then there is a very good chance that they would not hang around. To not lose traffic like that, having a easy mobile friendly website is what you are advised.
Having a single unified pixel for both custom audience and various conversions decreases the load time drastically!
c) Your website traffic insights can be identified
The most obvious advantage is that you can now have clearer understanding of your website traffic (after pasting the new facebook pixel code in your webpage HTML). Here is what it looks like:
You can identify the URLs and domains which are getting traffic to your page; You can also find out from which device your page has been browsed (Desktop, android or iOS).
As you can see from the short summary on the insights page, we have already started tracking conversions of those who visit our “thank you page”. We also have two custom audience list – one that has people who visit our website and those who visit our blog.
So don’t be surprised if you get to see some more of our ads in future! We want you to see it. In fact, give us a holler if you do – it will be great to know how well it is working!
Bonus: Here is a tutorial on Shopify Facebook Ad tutorial to grow your store.


